This has been an amazingly eventful year for us. As newlyweds, we have experienced so many great, exciting, and overwhelming new things!
First and foremost, Thomas graduated from Medical School this year. I am so proud of all that he's accomplished- there is no way that I could endure the years of studying, lack of sleep (and money) that he had in order to make it this far! It's a blessing that he was able to go through college and medical school- and an added blessing that it's over!
Then the new obstacle began- residency. Residency is tough- for the interns and their family. Now that Thomas and I have relocated for his job, it's tough to do things together and to meet people in a new city. As I work from home, I find that I spend an extreme amount of time with only the cats for company. I'm not complaining- not even close. People apologize for the fact that I am a doctor's wife- and as a result kind of have to go it alone since he's so busy. No apologies necessary- I knew what I was getting myself into- and I'm glad that I did. Thomas is my life and I would follow him anywhere.
Now we're to the part where we bought our home. What an excruciating experience that was. With all the foreclosures in the area (and everywhere for that matter) it was a buyer's market. Why rent when we could call a place our own for the next four years? There was no way that we could buy in California and we were happy to jump at the chance to buy our first home in Phoenix- where the houses were cheap and plentiful. Happy, that is, until we started the process. I don't want to go into it too much because the experience is something that I would rather forget. It was difficult to say the very least and was a true test of our marriage!
So here we are, in our house for over 6 months. We have already come so far in making this house our home and adding what we need to make it ours. With all the new paint, carpet, countertops, furniture, etc you would think we would almost be done. Not so!
Here is my list of 2011 home resolutions:
1. Finish fixing the pool. I'll post about that whole debacle later to explain further. In short, we need to do some work on it which requires mucho dinero so we'll be saving for a bit to tackle that next year.
2. Paint the bathrooms, laundry room. I've got the paint swatches up.... now I've just got to decide on a color.
3. Re-carpet the living room. Most of that raggedy, stained carpet is covered by either furniture or an area rug so it's fine for now. But when we have kiddies in the house crawling around we'd rather it be on a cleaner surface.
4. Clean the grout or re-grout altogether. Our grout is black.... and it isn't supposed to be. That needs fixin.
5. Get new blinds. All of the blinds in every room are either broken (they won't stay up unless you tie the strings to a weighty object) or they are falling apart (chipped panels, broken strings, etc). I would really love to get new, energy efficient, and easy to open blinds for each room.
6. Finish the garage. It needs a new work bench, some storage, and some outlets added. It's kind of ridiculous that our garage only has one outlet at the moment- and it isn't even close to the work bench.
I'm sure that there are many many more projects that need doing around here and more will come up along the way. But this is just some of the bigger things I'd like to tackle- sooner rather than later- that I'd like to accomplish within the next year.
Wish us luck!!!
Friday, December 31, 2010
Tuesday, December 28, 2010
Finally- our new couch revealed!
We had gotten our couch at the same time that we got our dining room set- but I have been dragging my feet about posting the pictures. We had been using a futon as a sofa since moving in here until we had enough dinero to dedicate to the purchase of a new sofa.
Here's the before shot of our living room- in all it's futon inhabited glory: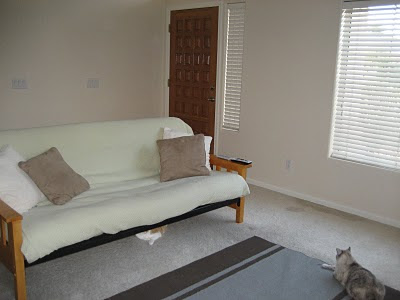
Before we decided on a couch to drop a couple hundred bucks on- I had a heavy list of criteria that needed to be met:
1. Our living room is not massive, so a sectional was not preferred, although a chaise would not be a total veto.
2. It's no secret that we have cats and that cats like to scratch things. I wanted to find us a couch that was not cat-scratch friendly.
3. Absolutely, positively, NO leather!
4. The back cushions have to be attached to the couch. The reason for this? The cats loved lying on top of the back cushions on my last couch which resulted in mushy cushions that needed to be re-stuffed to be more firm. Also, vacuuming the couch to remove cat hair was more difficult with cushions that moved around and got hair all the way around them. (Yes, I notice how much the cats are factoring into our decision- but it's completely necessary!)
5. I did not want a suede or suede-esque couch. I do not enjoy getting up from the couch and seeing my nice big rump imprinted in the fabric of the couch. I have enough anxiety as it is- I don't need to have it on display on our sofa! Ha ha!
Phew. Who knew that a couch would even exist that met all those standards that would be our style, comfortable, and affordable? Well, it does- and we found it! Plus, we bought around a holiday- so there was a deal for 15% off :)
Here's the new addition to our home:
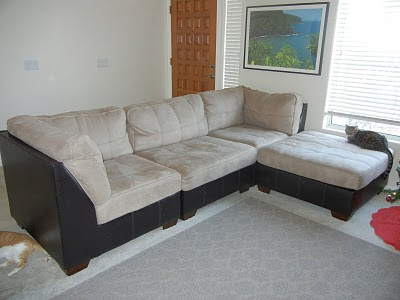
Here it is! We got ourselves one comfy couch- complete with a chaise and FAUX leather! It is made of that suede-like material but with the seams that criss-cross through the cushions there are no imprints of our behinds to be seen :) We are happy campers- and as you can tell from the picture, the cats also approve.
Here's the before shot of our living room- in all it's futon inhabited glory:

Before we decided on a couch to drop a couple hundred bucks on- I had a heavy list of criteria that needed to be met:
1. Our living room is not massive, so a sectional was not preferred, although a chaise would not be a total veto.
2. It's no secret that we have cats and that cats like to scratch things. I wanted to find us a couch that was not cat-scratch friendly.
3. Absolutely, positively, NO leather!
4. The back cushions have to be attached to the couch. The reason for this? The cats loved lying on top of the back cushions on my last couch which resulted in mushy cushions that needed to be re-stuffed to be more firm. Also, vacuuming the couch to remove cat hair was more difficult with cushions that moved around and got hair all the way around them. (Yes, I notice how much the cats are factoring into our decision- but it's completely necessary!)
5. I did not want a suede or suede-esque couch. I do not enjoy getting up from the couch and seeing my nice big rump imprinted in the fabric of the couch. I have enough anxiety as it is- I don't need to have it on display on our sofa! Ha ha!
Phew. Who knew that a couch would even exist that met all those standards that would be our style, comfortable, and affordable? Well, it does- and we found it! Plus, we bought around a holiday- so there was a deal for 15% off :)
Here's the new addition to our home:

Here it is! We got ourselves one comfy couch- complete with a chaise and FAUX leather! It is made of that suede-like material but with the seams that criss-cross through the cushions there are no imprints of our behinds to be seen :) We are happy campers- and as you can tell from the picture, the cats also approve.
Friday, December 10, 2010
Another person's old dresser is our new buffet :)
There are always a ton of yard sales going on in our neighborhood- even more now than in the summer since the weather is much more tolerable. And while I've never been real big on scavenging through other people discarded things, I have been more and more curious about attempting to score big ticket items to fill our empty walls and rooms. I was on the search for a couch or possibly a dining set. Since we recently purchased those items anyway (and couldn't be happier) I started to cool off on my yard sale drive-bys.
But, this past weekend there was a yard sale going on two blocks south of us. Just out of curiosity I did a drive-by and saw an old dresser. It wasn't that great so I didn't stop or get out. While running errands that day I passed by that street several more times and saw that no one had picked up that dresser. What could it hurt if I just looked at it? If anything, we meet a new neighbor and leave empty handed. So I asked Thomas if he wanted to take a walk. We went down there and surveyed our possible purchase. Upon closer inspection- I liked it- and I wanted it. "I'll make you a good deal," the homeowner said. Thomas was skeptical. I told him that we could use it as a buffet table in our dining room- and use it as a place to stash placemats and tablecloths. Thomas' response, "I dunno." It was the end of the day and the lady wanted to get rid of everything. "If you like it- take it." Sweet! So even if what I wanted to do with it didn't work out- we could put it on the sidewalk to be picked up or donate it and we wouldn't be out a penny. We took it.
Here's what it looked like in all it's (free) glory:
 And this is what it looked like after I sanded it down and removed all the old and dated hardware:
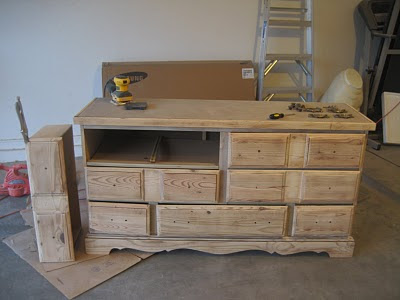
And finally, after four days of sanding and staining (and then sanding down some more and staining again) and adding some new door hardware, this is what we ended up with: Isn't it beautiful? Well, I think so. Staining was definitely a learning experience but I am enjoying my "learn as you go" do-it-yourself stuff. The buffets that I was looking at in stores would have set us back at least $300. The price for this? In total, for the stain, the brushes, the sandpaper, the door hardware and the sealer it only cost us a cool $68. Cool, huh? And the red mahogany that I stained it is a perfect match to our newly purchased dining room set.
But, this past weekend there was a yard sale going on two blocks south of us. Just out of curiosity I did a drive-by and saw an old dresser. It wasn't that great so I didn't stop or get out. While running errands that day I passed by that street several more times and saw that no one had picked up that dresser. What could it hurt if I just looked at it? If anything, we meet a new neighbor and leave empty handed. So I asked Thomas if he wanted to take a walk. We went down there and surveyed our possible purchase. Upon closer inspection- I liked it- and I wanted it. "I'll make you a good deal," the homeowner said. Thomas was skeptical. I told him that we could use it as a buffet table in our dining room- and use it as a place to stash placemats and tablecloths. Thomas' response, "I dunno." It was the end of the day and the lady wanted to get rid of everything. "If you like it- take it." Sweet! So even if what I wanted to do with it didn't work out- we could put it on the sidewalk to be picked up or donate it and we wouldn't be out a penny. We took it.
Here's what it looked like in all it's (free) glory:
 And this is what it looked like after I sanded it down and removed all the old and dated hardware:
And finally, after four days of sanding and staining (and then sanding down some more and staining again) and adding some new door hardware, this is what we ended up with:
 Isn't it beautiful? Well, I think so. Staining was definitely a learning experience but I am enjoying my "learn as you go" do-it-yourself stuff. The buffets that I was looking at in stores would have set us back at least $300. The price for this? In total, for the stain, the brushes, the sandpaper, the door hardware and the sealer it only cost us a cool $68. Cool, huh? And the red mahogany that I stained it is a perfect match to our newly purchased dining room set.
Monday, December 6, 2010
Dining Room Table
We bought our dining room table a couple of weeks ago- and it is beautiful. It's just one more thing that is making our house more into a home. With every bit of furniture we acquire our house looks more and more like a grown-up house... not one lived in by college students with random pieces and futons for couches.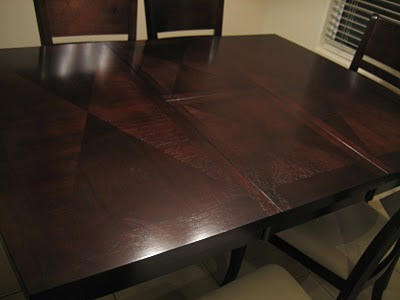

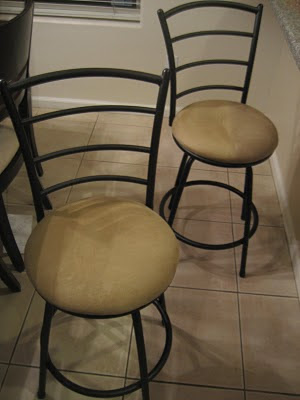
We bought the table at Ashley furniture and the swivel bar stools from Kohls. We scored the table with an awesome coupon in the mail and the bar stools were on sale :) The padded part is made up of the same material- but they aren't identical so it isn't too matchy matchy.
 Now we can finally eat dinner at a table instead of in front of the tv w/ our tv trays. Oh happy day :)
Friday, November 12, 2010
New Sink
In our last post we shared how we gutted out our old sink as we were replacing our old counter-tops with gorgeous granite. I neglected to show the after pictures of the sink that we had installed. Trust me- it's just as amazing as the counters.
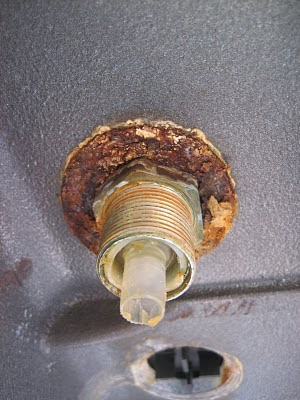
Upon closer inspection you can see how clearly neglected this sink was. Where did anyone wash anything? It doesn't seem like soap ever hit this drain! So yuck! This is also stained a nice putrid rust color.
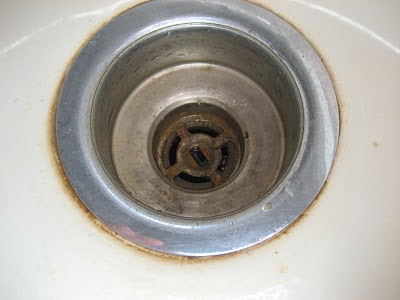
This is the part that made me truly happy to toss this sink out. This is the bottom of the soap dispenser (which didn't have the dispenser attached to it anyway). Nicely rusted and corroded.
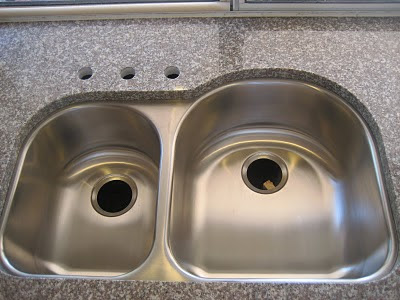
And here are the after pictures of our beautiful new under-mount stainless steel sink complete with no rusty soap dispenser, clean drains and stain free basin :)
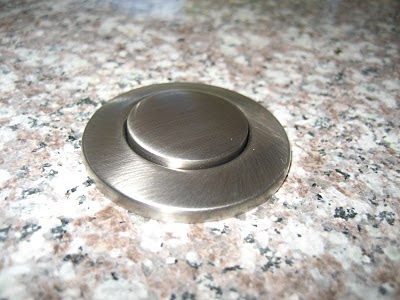
Here's my favorite part. Our garbage disposal button :) The elderly gentleman got scared when I shouted with excitement as he showed us this option. So 21st century, yay!
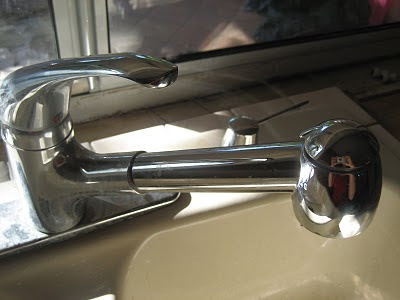
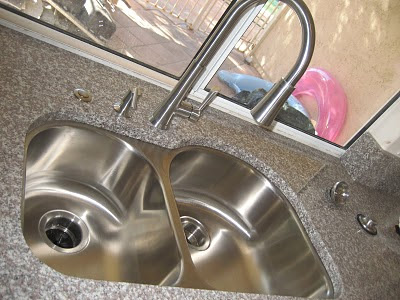
And here's the whole shibang. We love our beautiful faucet and flawless sinks!
Here are the before pictures of our old sink: stained and yucky. This faucet wasn't bad- just not very glamorous. Plus, it only twisted into the sink on the right... it wouldn't turn the other direction unless you pulled it out and used the hose.
 This faucet wasn't bad- just not very glamorous. Plus, it only twisted into the sink on the right... it wouldn't turn the other direction unless you pulled it out and used the hose.
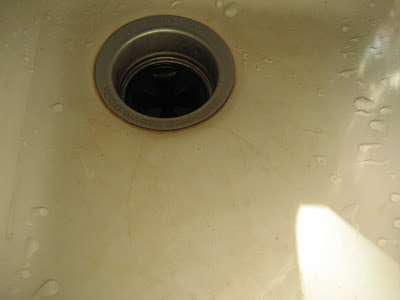
Here you can better see the stained sink basin. It's supposed to be ivory white but it's really more yellow with some old ring marks that would not be scrubbed away.

Upon closer inspection you can see how clearly neglected this sink was. Where did anyone wash anything? It doesn't seem like soap ever hit this drain! So yuck! This is also stained a nice putrid rust color.

This is the part that made me truly happy to toss this sink out. This is the bottom of the soap dispenser (which didn't have the dispenser attached to it anyway). Nicely rusted and corroded.

And here are the after pictures of our beautiful new under-mount stainless steel sink complete with no rusty soap dispenser, clean drains and stain free basin :)

Here's my favorite part. Our garbage disposal button :) The elderly gentleman got scared when I shouted with excitement as he showed us this option. So 21st century, yay!

And here's the whole shibang. We love our beautiful faucet and flawless sinks!

Now the only problem that we have is that the sink is so pretty that we don't want to put any dirty dishes in it!
Wednesday, November 10, 2010
First Major Project- COMPLETE!
Last Monday our counter-tops were finally installed and they are far more beautiful than we could have imagined! It is so amazing how changing one room can give your whole house a face-lift! When you see our kitchen now you have to second guess yourself, "Am I in a new house?" Fantastic!!!
Before the counters could be installed we had to completely remove the old plywood that was serving as our temporary counters. We also had to rip out the old sink (good riddance) and turn off all the plumbing. Here's what that process looked like:

And here he is tearing out the old sink! So heavy!

Taking it out to the pile of the remains of our old kitchen:
 Where the sink used to be:
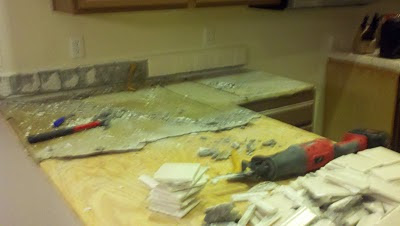
Starting to remove the wood counters: You can see that we had started to graffiti on the wood :)
 All ready for new granite counters:

Oh yeah. I forgot to mention that we weren't only putting granite in the kitchen! We also have a hallway cabinet that could use a little love. We thought that it would tie the kitchen and hallway together nicely if we used the same granite there too and give the main section of the house a nice flowy feeling. So we had to pry off the old wood that was on top of those cabinets as well- but instead of having no top at all (like in the kitchen) there was still the top of the cabinets underneath. So we decided to do something fun and create a type of time-capsule for any future residents that might undo our current upgrade.
 Ooh, you've got chills right? It looks THAT good!!! Okay, maybe you might not- but we definitely do. And now for the grand finale... the kitchen :)


They even matched the glue that they use to seal any gaps.


And here it is- TADA!!!!!
Goodbye crummy tile- Hellooooooo granite :) Imagine us doing our happy dance here- because we totally are :)
Before the counters could be installed we had to completely remove the old plywood that was serving as our temporary counters. We also had to rip out the old sink (good riddance) and turn off all the plumbing. Here's what that process looked like:
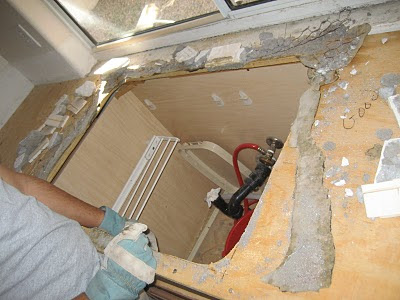
Here's Thomas disconnecting the plumbing:

And here he is tearing out the old sink! So heavy!

Taking it out to the pile of the remains of our old kitchen:
 Where the sink used to be:
Starting to remove the wood counters:
 You can see that we had started to graffiti on the wood :)
 All ready for new granite counters:
This is what we did: That's kinda fun, right? Well, we thought so.... and this is what the hallway cabinets looked like after we installed the granite:
 That's kinda fun, right? Well, we thought so.... and this is what the hallway cabinets looked like after we installed the granite:
 Ooh, you've got chills right? It looks THAT good!!! Okay, maybe you might not- but we definitely do. And now for the grand finale... the kitchen :)

They even matched the glue that they use to seal any gaps.


And here it is- TADA!!!!!

Monday, October 25, 2010
♫ We've only just beguuuuun ♫
The weather is starting to turn here in Phoenix. We kept hearing that the fall and winter were wonderful but we had been experiencing a prolonged summer this year :( But I am happy to report that we have been experiencing cooler temperatures as of late (it was even chilly enough in the house the other day that I got to bust out my fuzzy slippers) and I couldn't be happier! With cooler temperatures brings more energy for me and more energy equals the ability for me to do MORE instead of sit on the sidelines and watch Thomas do most of the heavy duty work (which I'm sure he will appreciate as well).
Demolition has begun in our kitchen... well, what's left of our kitchen anyway. I had to fly off to Los Angeles to work on the Long Beach Marathon and Thomas took that opportunity to gut our kitchen counters. Boy am I glad that he did it while I was away. The mess, the noise, the dust would have been enough to make me chew my fingers down to nubs. On top of all of that Thomas preferred that my asthmatic lungs not be exposed to that much flying debris. Thank the Lordy for that!
It all started out just a little bit at a time so that we could experience how easy (or how difficult, rather) this job really was going to be.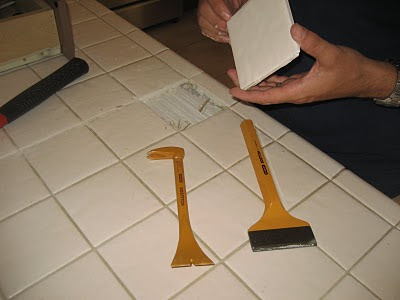
And the job continued while I was away in California for work. Pardon all of the grainy photographs but I took my camera with me on my trip so Thomas took these pictures to send me updates on his progress while I was away. Here's what the process looked like:
We still have to rip out the sink but we obviously don't want to do that until the last minute. We don't want to be stuck without a sink!! For now we're living with our lovely plywood counters complete with old staples and splinters galore! It's still way better than the tile and horrible grout!
Side-note: We had decided to do the demo ourselves because our kitchen is so large that it would have cost more than $800 to have someone do it for us. So we though, "No problem- we'll do it ourselves!" I mean, who doesn't like saving $800? Well, Thomas says that if we ever do anything like this again that we will definitely be shelling out the dough to have someone do it for us. Apparently he did not enjoy it!
Our counter-tops were supposed to be installed this Wednesday and I was uber excited about the kitchen being near completion before Halloween but, alas, my civic duty calls and I have jury duty for the time that the install was scheduled for so we'll have to wait another couple of days and have them installed the following Monday. I'm still keeping my fingers crossed for the main living spaces to have the big projects done by the end of the year.
Demolition has begun in our kitchen... well, what's left of our kitchen anyway. I had to fly off to Los Angeles to work on the Long Beach Marathon and Thomas took that opportunity to gut our kitchen counters. Boy am I glad that he did it while I was away. The mess, the noise, the dust would have been enough to make me chew my fingers down to nubs. On top of all of that Thomas preferred that my asthmatic lungs not be exposed to that much flying debris. Thank the Lordy for that!
It all started out just a little bit at a time so that we could experience how easy (or how difficult, rather) this job really was going to be.

And the job continued while I was away in California for work. Pardon all of the grainy photographs but I took my camera with me on my trip so Thomas took these pictures to send me updates on his progress while I was away. Here's what the process looked like:


We still have to rip out the sink but we obviously don't want to do that until the last minute. We don't want to be stuck without a sink!! For now we're living with our lovely plywood counters complete with old staples and splinters galore! It's still way better than the tile and horrible grout!
Side-note: We had decided to do the demo ourselves because our kitchen is so large that it would have cost more than $800 to have someone do it for us. So we though, "No problem- we'll do it ourselves!" I mean, who doesn't like saving $800? Well, Thomas says that if we ever do anything like this again that we will definitely be shelling out the dough to have someone do it for us. Apparently he did not enjoy it!
Our counter-tops were supposed to be installed this Wednesday and I was uber excited about the kitchen being near completion before Halloween but, alas, my civic duty calls and I have jury duty for the time that the install was scheduled for so we'll have to wait another couple of days and have them installed the following Monday. I'm still keeping my fingers crossed for the main living spaces to have the big projects done by the end of the year.
Friday, October 1, 2010
Frame the Date
A couple of weeks ago I made a little diy art project for our wedding anniversary- I framed the date :) I had used an old frame that I had that was a little beat up, some card stock and some stickers to make it all happen. When I finished I had something that looked like this: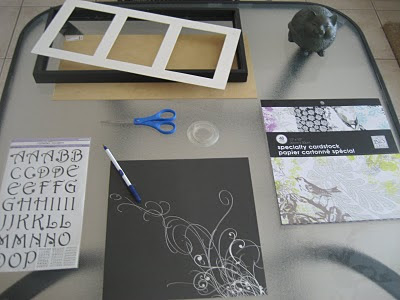
 But- after looking at it for a couple of days and not quite knowing where I wanted to put it- I got to thinking that maybe black isn't the best color to showcase our wedding date. The white part of the frame is about 8 years old now and not quite as white as it used to be so I decided to paint it silver to match the accent on the cardstock. Next, since the black frame itself was beat up and had some chips in it that needed touching up I decided to go with a complete overhaul and just paint the thing a clean, crisp white. This is how it ended up looking:
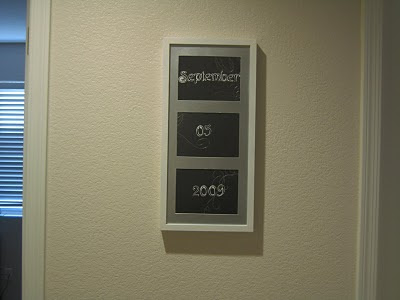
I thought that with the new color scheme that it would look really nice in our hallway with our monograms and cardstock art. But the new dilemma? The frame is too small and the wall still looks kind of naked. My solution? Wallflowers! Now the wall has a little bit of pop and a lot more personality. Yay for a fun wall! I have some leftover wallflowers too so hopefully I'll be able to coordinate them with other projects coming up.

 But- after looking at it for a couple of days and not quite knowing where I wanted to put it- I got to thinking that maybe black isn't the best color to showcase our wedding date. The white part of the frame is about 8 years old now and not quite as white as it used to be so I decided to paint it silver to match the accent on the cardstock. Next, since the black frame itself was beat up and had some chips in it that needed touching up I decided to go with a complete overhaul and just paint the thing a clean, crisp white. This is how it ended up looking:
I thought that with the new color scheme that it would look really nice in our hallway with our monograms and cardstock art. But the new dilemma? The frame is too small and the wall still looks kind of naked. My solution? Wallflowers!
 Now the wall has a little bit of pop and a lot more personality. Yay for a fun wall! I have some leftover wallflowers too so hopefully I'll be able to coordinate them with other projects coming up.
Tuesday, September 28, 2010
Kitchen: Phase 1 (Complete)
Our kitchen is finally put back together! Well, almost. We still have to put the panels back that go under the sink but first we need to find new hardware that attaches to hold ouR sponge, scrubber, etc. But besides that we have our kitchen back! All the cabinet doors are back on and the drawers are back in their place (thank goodness- that clutter was stressful!). Now we have our beautiful chocolate kitchen. Ready for the big reveal? Hold on- we have to remind you what the before looked like- so you can really get a feel for how different it looks now :)
We're going back to order our countertops around September 30th (when they have some extra special deals on granite) and will hopefully have our whole kitchen finished before Halloween! We're so excited! Even with just the paint change it's given our kitchen a whole new fresh look! The granite and door hardware will really just be the icing on the cake :)
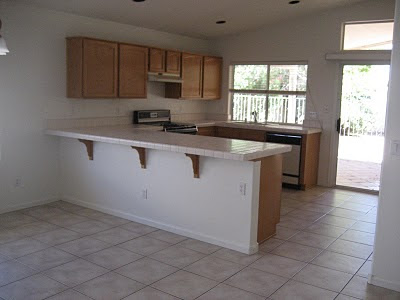
BEFORE:

AND AFTER: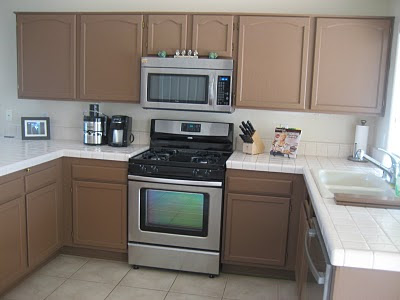

We absolutely love it! As it is now there is a huge contrast between our white tile counter tops and the milk chocolatey cabinets but once we get out granite counter tops installed we'll have a perfect balance between our new darker kitchen and our sandy painted walls.
We're going back to order our countertops around September 30th (when they have some extra special deals on granite) and will hopefully have our whole kitchen finished before Halloween! We're so excited! Even with just the paint change it's given our kitchen a whole new fresh look! The granite and door hardware will really just be the icing on the cake :)
Wednesday, September 22, 2010
A Work in Progress: Painting Our Kitchen
After looking at the paint swatches that we had taped to our cabinets for a week we decided on a milk chocolate brown to paint our cabinets. It would be a nice contrast against our light walls and it matches pretty perfectly with the countertops that we have picked out. So now we begin the process of DIY: paint your kitchen cabinets edition. First things first: we had to remove all of the cabinet doors and drawer fronts and with a kitchen as large as ours that alone was a time consuming endeavor. Thomas bust out his trusty drill and got to work. On top of that- each door and drawer had some sticky goo leftover from the rubber stoppers that were on the back of each of them so that needed to be removed as well before I started painting.
 Next it was time for me to tape it all up and paint away. Unfortunately all of the "fail-proof" tape didn't work on our textured walls so I'll still have to go around with touch up paint to cover up what bled under the tape :o(
 And now the real process gets started. I went around all the nooks and crannies with a regular paintbrush- just in the places I wouldn't be able to get with a roller. Any brush marks left behind would be easily covered with our polyester roller.
 This is after I got all the nooks and crannies...
 And what they look like with two beautiful coats applied:
 Now we just have to wait a few days to make sure that they are completely dry. In the meantime I went around with a craft sponge brush to get all the little extra nooks around the cabinets that are just too small to get a roller or a paint brush in there. Using a steady hand my DIY paint job looks just as good as if we were to pay someone $3,000 to do it for us. (That's an actual quote that we got- that's when we said "FORGET THAT! We're doing it ourselves!)
 You'll have to wait for the next post to see what the kitchen looks like when it's all put together with the new paint. In the meantime, I've included a picture of what our kitchen looks like at this very moment- a mess! So stressful! I can't wait for it to be finished and everything to be put back in it's rightful spot!
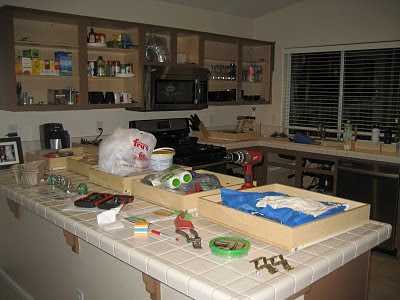
 First things first: we had to remove all of the cabinet doors and drawer fronts and with a kitchen as large as ours that alone was a time consuming endeavor. Thomas bust out his trusty drill and got to work. On top of that- each door and drawer had some sticky goo leftover from the rubber stoppers that were on the back of each of them so that needed to be removed as well before I started painting.
 Next it was time for me to tape it all up and paint away. Unfortunately all of the "fail-proof" tape didn't work on our textured walls so I'll still have to go around with touch up paint to cover up what bled under the tape :o(
 And now the real process gets started. I went around all the nooks and crannies with a regular paintbrush- just in the places I wouldn't be able to get with a roller. Any brush marks left behind would be easily covered with our polyester roller.
Here's the before. See? Lots of cabinets!
 This is after I got all the nooks and crannies...
 And what they look like with two beautiful coats applied:
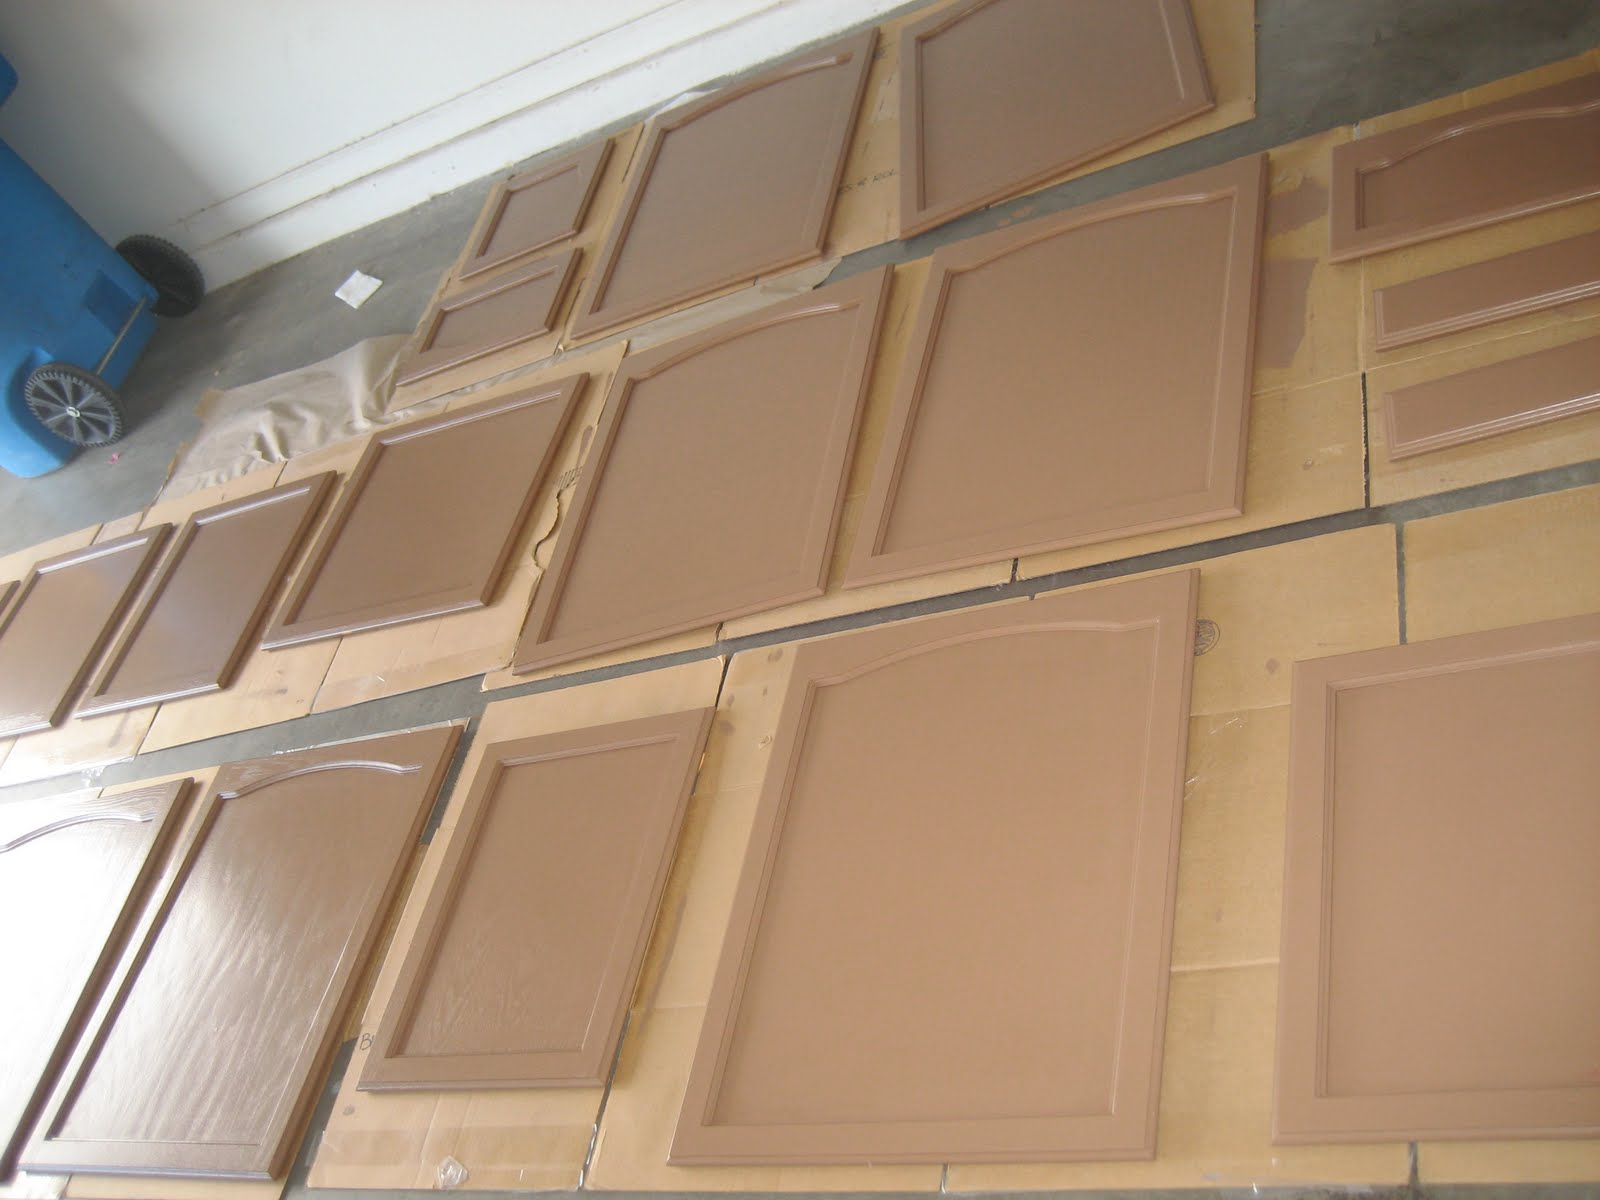 Now we just have to wait a few days to make sure that they are completely dry. In the meantime I went around with a craft sponge brush to get all the little extra nooks around the cabinets that are just too small to get a roller or a paint brush in there. Using a steady hand my DIY paint job looks just as good as if we were to pay someone $3,000 to do it for us. (That's an actual quote that we got- that's when we said "FORGET THAT! We're doing it ourselves!)
 You'll have to wait for the next post to see what the kitchen looks like when it's all put together with the new paint. In the meantime, I've included a picture of what our kitchen looks like at this very moment- a mess! So stressful! I can't wait for it to be finished and everything to be put back in it's rightful spot!
Wednesday, September 15, 2010
Kitchen Makeover- The Beginning
Our home was used as a rental property for years before we purchased it. As a result, many of the fix-its around the house were done poorly and cheaply. As time goes on we find more and more things that aren't up to par but nothing serious has really come up- so far everything is fixable. For example: our ancient front door hardware- replaced, the rotten toilet parts- fixed, the broken sprinkler system- we're working on it.
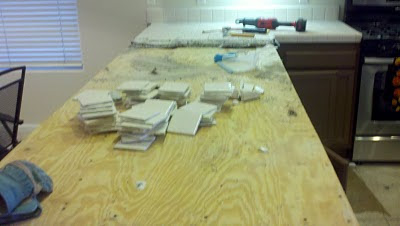
 This house needs a lot of tlc that it just hasn't been getting. With our newly acquired rebate we decided that the first thing that needs a facelift is our dated kitchen. We've got white tile countertops with stained grout that seems to embody all the colors of the rainbow embedded in the 15 year old grout. Yuck. The cabinets aren't in bad shape, but they need to be refinished and have some hardware added. Luckily the inside of the cabinets look brand new! We've already tackled replacing the old appliances and adding a microwave over the stove... but now it's time to get into the big time stuff!
But before we jump all the way into a kitchen renovation we decided to sand down the backside of one of the cabinet doors and stain it the color we were thinking of doing the kitchen. Thank goodness for sample size stains! It looked awful! The wood grain in the door sucked up so much of the stain that it was many shades darker than the rest- not the look we are going for at all. So instead of staining, we have decided to paint.
I picked out a bunch of paint swatches and taped them to one of the cabinets so that I could look at them for a few days in different lights before settling on a color. I also got a paint sample to paint the cabinet door to make sure that the paint went on smooth and evenly.
If all goes according to plan- this weekend will be dedicated to painting the cabinets. Keep an eye out for the next post to be the after pictures! Soon after that we should be looking into getting our new countertops! Re-doing the kitchen is going to be giving our whole house a facelift!!! We're really excited about it!
 This house needs a lot of tlc that it just hasn't been getting. With our newly acquired rebate we decided that the first thing that needs a facelift is our dated kitchen. We've got white tile countertops with stained grout that seems to embody all the colors of the rainbow embedded in the 15 year old grout. Yuck. The cabinets aren't in bad shape, but they need to be refinished and have some hardware added. Luckily the inside of the cabinets look brand new! We've already tackled replacing the old appliances and adding a microwave over the stove... but now it's time to get into the big time stuff!
But before we jump all the way into a kitchen
 renovation we decided to sand down the backside of one of the cabinet doors and stain it the color we were thinking of doing the kitchen. Thank goodness for sample size stains! It looked awful! The wood grain in the door sucked up so much of the stain that it was many shades darker than the rest- not the look we are going for at all. So instead of staining, we have decided to paint.
I picked out a bunch of paint swatches and taped them to one of the cabinets so that I could look at them for a few days in different lights before settling on a color. I also got a paint sample to paint the cabinet door to make sure that the paint went on smooth and evenly.

If all goes according to plan- this weekend will be dedicated to painting the cabinets. Keep an eye out for the next post to be the after pictures! Soon after that we should be looking into getting our new countertops! Re-doing the kitchen is going to be giving our whole house a facelift!!! We're really excited about it!
Subscribe to:
Posts (Atom)