Thursday, February 24, 2011

Thank Goodness Paint Swatches Are Free....

... because I've been smuggling a boat-load of them out of Home Depot and Lowe's.

What's the reason for my most recent trip to the paint departments? Well, aside from the fact that I still have not decided on a hallway bathroom/laundry room/master bathroom paint color (they will all probably be the same color) I've decided to paint- not stain- the bathroom vanity.

Here's how I came to that decision. First of all- last I posted I said my staining days were probably over. That statement was probably made more out of my defeat for that particular project but I'm still not over the burn of the less than stellar results from that undertaking. I decided that I wanted to give it one more shot and see if it was even possible for me to get the junk off that I applied. So I bust out my power sander and got to work. Thankfully, and to my complete surprise, it didn't take much elbow grease or sand paper to get it all off. The down side is that with wood cabinets like ours, the stain really sinks into the wood grain- leaving us with this:
The door on the left shows what it looked like before my staining debacle while the one on the right shows what I'm working with after sanding it down... again. I didn't think it was that big of a deal because, after all, if I was planning on slapping on another layer of dark stain it would just cover it right up.

New problem. Turns out the veneer on our cabinets is pretty thin. So after sanding down everything I had completely gone through some parts of the veneer entirely leaving this:
The problem with this is that with the veneer gone the stain will soak in differently and unevenly. So staining is now completely off the table.

New solution- enter paint swatches. People paint their vanities white all the time and it looks amazing. So why can't I paint it a deep, rich brown? After all, it worked out on our kitchen cabinets. So I slapped these babies up to look at them for the next day or two and hopefully I can begin painting this weekend. I've already narrowed it down to six paint colors- I immediately tossed two of them once I got them in the room- leaving me with these options:
I also picked up some new paint colors for the wall. After my recent epiphany that I'm sticking with safe (and not fun) color and design schemes I thought that maybe I should try to spice things up a bit. So I got these new swatches:
I am already proud of myself for picking these new brighter colors! I'm really liking the look of them too :) I haven't completely tossed my old swatches though... these ones are still up in the laundry room:

If the hallway bathroom turns out amazing with a bright color maybe I'll even work up the courage to get different colors for the master bathroom and laundry room!

Wednesday, February 23, 2011

A Splash of Color

To say that I like things to coordinate is an understatement. My obsessive compulsive tendencies result in my getting irritated if things clash too much or just don't match. And when it comes to decorating our house I've developed an anxiety about just taking a risk and buying things for our place.

Here's my dilemma- our living room is so well coordinated (minus the bookshelf and tv stand which are two different colors- I'll get to that one day) that now I'm bored! See below picture to see what I mean:

It looks nice- but that's not my issue. The sandy walls, the brown couch, the cream carpet, the beige rug.... where's the color!? I'm getting so bored of looking at the same boring color- and it's everywhere! I've wanted to get some pretty throw pillows, maybe another rug, just something to spice the space up. Problem, I'm afraid of doing anything too bold!

My solution- start small. Worse comes to worse I have to make a return to the store to get something I like better. Here's what I ended up snagging:I'll be the first one to say that this is a minor upgrade at best. The room still needs some work, some color, some flair, possibly some more pattern? But my point is that I'm taking baby steps toward a more interesting color pallet.

Pat on the back for me :) Plus, these plush throw pillows were on the cheap at Kohls. $13.00 each marked down from $33 each plus I got to use $20 Kohls cash. So at least my baby steps didn't throw us into the deep end :)

P.S. Rascal jumped into my "after" pictures to stalk some doves outside.

Wednesday, February 16, 2011

The Money Pit

Since becoming official homeowners on June 9th of last year, Thomas and I have taken on the role of student when it comes to our house. The whole thing is one giant learning experience. One of the biggest lessons that we've learned? That having a home is tough, having a pool is tougher. That pool has been a headache from day one.

Here's a little reminder of what it looked like when we got possession of the house:
Here we were thinking, "Awesome, our first house has a POOL!" How great! Plus, we live in the desert, it's totally necessary! Well, that was then..... we feel differently now. We have fought tooth and nail to keep this pool from continually turning green to no avail. We tried taking care of it ourselves. We tried having a professional pool guy come and get us started with a monster shock treatment. Nope. It still turned green.

All those chemicals aren't cheap either. Added bonus: with the heat here in Phoenix, the chemicals burn off super quick so we were constantly dumping more and more chemicals in there to the point where our whole yard stunk of chlorine. We were continually burning (literally) through our chemical supply. I've also learned through all of this that I can't stand pool supply stores. Seriously, I revert to being a whiney little kid when we have to go. I avoid it at all costs.

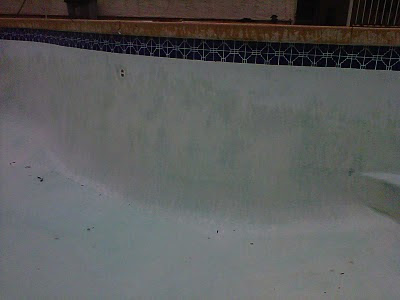
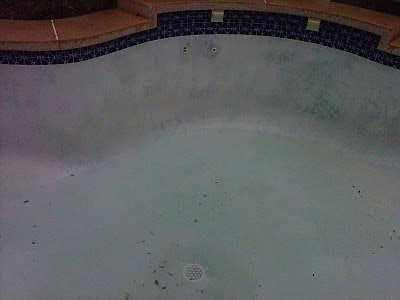
After many, many, many trips to test the water at the pool supply shop we finally figured out that we needed to drain the pool and get an acid wash. Our algae problem was just too severe. Here's what it looked like after the pool was drained:

YUCK! It looked 10x worse without the nasty water in it. Next thing we found out when we had the pool drained? We don't just have algae- we have black algae. What is black algae? Well, it's like death for a pool! Okay, that might be an exaggeration, but it's bad. It doesn't go away with a simple acid wash (which is diluted). The pool peeps we hired had to make an acid paste and slap it on anywhere in the pool that had those black patches so that it could really sink in and kill it. Not only that- but the guy said that our algae problem was so bad that he had to do two acid washes because one just didn't cut it. Thankfully I was visibly upset when he told me this so he didn't add any extra charges. Yay for being an emotional girl!

When the washes were done though, our pool still looked like this:See the splotchy imperfection? So our pool dude informed me that our pool used to look beautiful and perfect and a deep aqua blue like our neighbors pool. But because of years of neglect our pool now looks like this. How do we fix this? With a $4,000 pool resurfacing :( The water works started again, but the pool dude couldn't help me this time with a cost break because he doesn't resurface pools. Obviously we don't have the cash to go ahead and deal with the problem now.

The good news is that we should be able to maintain the pool as is (no green muck) with chlorine until we can get it resurfaced. Another downside: since we do have the black algae issue and he couldn't guarantee that it was totally gone (it burrows under the plaster- the little jerks!) we have to keep our pool with at least a 5% chlorine level and even higher in the summer which is similar to what public pools do instead of the regular 2% otherwise recommended.

So after two days of the acid wash and refilling the pool we have started saving for our pool to be resurfaced. Luckily we were told that we should be able to hold out for 2 years before it becomes totally necessary. And with the pool refilled you can't really tell how uneven the plaster is. This is what it looks like as of right now:A million times better and many lessons learned.

Monday, February 14, 2011

The Bathroom Boo-Boo

Okay- so I'm not about to sit here and profess that I am the perfect diy-er. Nope, completely the opposite. I am taking it all as it comes and learning from my experiences. I am super new to this whole thing. Furthermore, just because I was able to master one project does not necessarily mean that I will be able to conquer a similar project. Case in point- staining the bathroom vanity.
I thought that through my trials and tribulations that I encountered while re-finishing a yard sale dresser meant that I had the staining process down. Not so :( In fact, I may be so bold as to say that my staining days are over.

As I mentioned in a previous post- I wanted to start working in the hallway bathroom. Specifically I wanted to "remodel it without remodeling it" and working with/updating what we have in there. My vanity solution? Take the light and bright birch vanity and transform it into a rich and bold mahogany vanity with new brushed nickel door hardware. I spent this past weekend removing the doors and drawer fronts and sanding off all of the old veneer to guarantee a smooth application of the stain. After hours and hours of using our power sander I followed up with using our newly acquired handheld Dremel to get in all the nooks and crannies of the cabinets. (Don't know what a Dremel is? Think a hardcore heavy duty version of what they use on your finger nails when you get your nails done.) After mucho mucho sanding- I ended up with this:Looks good right? Looks like I did a pretty darn thorough job getting all that old polyeurathane off to ensure a smooth and even coat of stain, right? Well, maybe it looks that way.... but... well let me just further explain how the whole thing went down.

After spending forever sanding these puppies down and looking like I had just walked out of a fight with a dust storm (yes, I was that covered with saw dust) I wiped off the excess dust from the doors and applied a coat of a pre-stain wood conditioner. This product is supposed to ensure what I had been working so hard to accomplish- even application of the stain. Let me tell you- if the staining process went as smoothly as the pre-stain conditioning process, I would be writing an entirely different blog entry right now. Oh, this is where the happy part of the story ends. With my desire to make this process more efficient I obtained a stain that combined the staining of the wood with the sealing of the wood. Yes, I bought a stain that had the polyeurathane mixed in with it. Tisk tisk. That was a mistake. With the polyeurathane mixed in already it created a sticky glue-like application. Not the best thing when your trying to achieve a uniform look. Let me just say now, if you are looking to do some stain work in the future: DO NOT GET THE STAIN WITH THE POLYEURATHANE MIXED IN! GET THEM IN TWO SEPARATE CANS TO BE APPLIED AT DIFFERENT TIMES!!!

This is what the first coat looked like:
Alright, it didn't apply evenly and it isn't even close to being as rich of a color as indicated on the can and the samples provided at the store. But the can says that you can apply up to four coats to achieve a uniform look or a deeper color. What the can doesn't say is that with each additional coat of stain you are fighting against the stickiness of it all which makes application that much more difficult.

Here's coat #2:Umm... it's starting to look messier! Not more even. Definitely deeper in color but it's harder to cover up inconsistencies when the color is so deep! "Well, I thought, the can says up to four coats. Maybe it gets better." WRONG!

Coat #3:
OH. MY. GOSH. I am not a happy camper. Not only did I just spend my entire weekend working on this but it would take me FOREVER to get this stuff back off. Painting over it would have been an option if the polyeurathane was not mixed in. But since it is- it would be like painting over latex paint... it'll just peel right off.

Thomas had to console me when I sat in our backyard holding my head in my hands and unleashing my tears of defeat. "It doesn't look that bad," he said. But that's not the point. It's not about how far down the spectrum of bad it is. It isn't supposed to look bad at all! Not even a little bit :( The whole point of a diy project is to do something for your home that saves you money, gives you a feeling of accomplishment, and looks just as amazing as if you had paid someone an arm and a leg to do it for you. That is not what happened here.

But I'm not ashamed. I made a mistake. I tried to take a shortcut when I should have stuck with a process had worked for me before. I'm still planning on doing a lot of work on this house. My diy days are not over! I may have lost this battle- but I haven't lost the war! Am I getting too crazy here? Seriously, what war?

Anyway, I am looking into having someone come out and give us some estimates on refinishing the cabinets for us- the right way. With just a small vanity- it shouldn't break the bank, or my spirit. No more tears will be shed over a badly stained cabinet. And fortunately I only started on the doors. The base of the vanity is still untouched and will look like this for a while until I can figure out a way to finish the project.