Wednesday, October 19, 2011

Getting the Pool Fixed - Again.

After we got our pool acid washed last winter it was made very clear to us that it was in bad shape.  After years of neglect by the previous owner (who only bought the place for rental income and therefore lacked giving the place any TLC) and improper care it was left in a state of distress.  The existing plaster was thin and blotchy and the black algae that was in it would continue to be a real pain to keep clear.  Since that fateful day, Thomas and I decided that we needed to start saving to get the darn thing re-done.  We were hoping that we would have a good two years to save up- a little at a time- but you know that things don't always go according to plan.

Reasons for speeding up the savings process include: a) our chlorine levels needed to be kept higher than usual (around 5% when the norm is around 2%) to keep the algae at bay and chemicals aren't cheap, b) the extreme Phoenix heat made it darn near impossible to keep on top of the chemicals since it burned off so quickly, c) the great dust storm over the 4th of July weekend quickly turned our pool back to green, and d) we could not get it back to clear again.  You think that a little dust storm couldn't cause that much damage?  Well, think again.

Here's a picture of what that storm looked like.
It's a 50 mile wide thick cloud of dirt that came sweeping in.  Nothing was safe!  It was so thick that the airports shut down because visibility was practically 0!

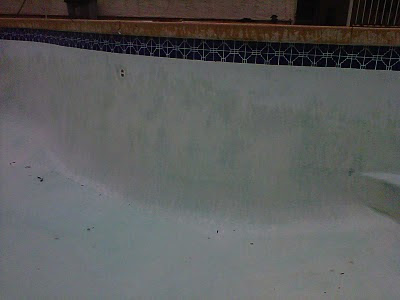
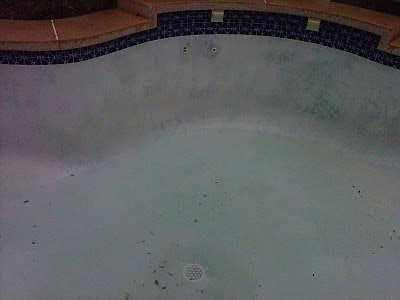
Which meant that our pool went back from looking like it did in December when it was acid washed:


Back to this:

Of course now that Baby Bravo is on the way, we needed to make sure that we did what was effective and affordable.  Naturally I would love to have all of the bells and whistles added to the pool when we redo it... but now with Sprout set to make their appearance in May- we needed to be more practical.  And really, why get the bells and whistles when we are only planning on being here for another couple of years anyhow?  We'll save the big guns for our forever home.

We had several companies come out and give estimates that ranged from $2,100 all the way up to $7,000+!  We ended up settling on a family owned pool company called Mercury Pools that could give us a beautiful (and premium!) pebbletec surface for $3,400.  Sure, it still ain't cheap- but it's going to make us happy (and it was much less expensive than the competitors).  And if that's what we need to do in order for me to go in the backyard without screaming expletives at the black lagoon that is our pool... then so be it!  Plus, a pebbletec finish is less maintenance which makes this prego happy.

We chose the finish in Glacial White which looks like this:
It's grainy- I know... but you get an idea of what it looks like.  It's not solid white: it's got some grays, yellows, and greens in there.  I know that white seems like a boring choice but it's really what worked for us.  There are more exciting and even prettier colors to choose from but from what we learned... color is more expensive (and we're already shelling out a hefty chunk of dough) and it also absorbs heat. And let me tell you, the pool does not need any help in that department since in the summertime it heats up pretty well on it's own in the sun... therefore, the cooler the better which translated to the lighter finish the better.

We still haven't decided whether we want to replace the tiles in the pool or not.  They are dated and definitely wouldn't have been my first choice had I been able to choose... but again it comes back down to Baby Bravo and what is or isn't necessary to dish out.

The guys are here now draining the pool and demo begins tomorrow!  I am SO excited!!

Friday, September 30, 2011

We're Preggers!


**Warning**  This entry involves talk about things that may gross you out.  So if you don’t want to know about my period or things of that nature- stop reading now.

I had been off of birth control since February and Thomas and I had talked about becoming pregnant for a while now.  We didn’t want to make it super public knowledge that this was a part of the plan so that we wouldn’t have to deal with inquiries about “how’s it going?”  Giving people a heads up would really kill any sort of surprise.  Plus, if we ended up having trouble conceiving we didn’t want to have to explain that to anyone.  It’s a known fact that anyone who has been asking us about, “When are you guys going to have kids?” or anything to that effect has been bothersome to me.  Not because I wouldn’t want to share the good news, but to be frank, it’s really no one’s business.

Anyway, since taking myself off of birth control I had been experiencing really abnormal periods.  My cycles varied from 41 to 48 days and all of the articles that I was reading about it said that cycles that long tend to mean that you aren’t ovulating.  On top of that all of my premenstrual symptoms were exaggerated as compared to when I was on the pill (which is why I’ve been on it anyway- not as a means of actual birth control).  I was really moody, in huge amounts of pain, and cried… a lot.  It was adding insult to injury that my period just wasn’t coming on schedule.  It’s very unsettling when something doesn’t show up when it’s been showing up on time (relatively) for the past 14 years.  It was even more upsetting that I knew it wasn’t because I was pregnant.  Because of these long cycles, I had made it a habit to take pregnancy tests- not to see if I was pregnant but rather to reassure myself that Aunt Flo was coming.

After six months my cycles started to regulate.  It went from 48 days one month, to 42 days the next, to 31 days.  I was thankful that regularity was starting to happen.  Getting my cycle below 40 days meant that I was probably ovulating again! 

The next dilemma was trying to make sure that I got my period before Thomas and I went on our Hawaiian vacation.  No woman wants to be bloaty, teary, crampy, and grumpy on your vacation- especially when you’re supposed to be in a bathing suit.  It seemed that my regulating happened just in time.  That would put my expected date to start my period on August 29 (or sooner if my cycles continued to shrink).  So you could imagine how antsy I was waiting for my monthly gem to show up.  By midday on the 29th I started to get really anxious- so I went back to my previous habit of grabbing a pregnancy test to reassure myself that it was coming.

Normally when I take the test it pops up “Not Pregnant” pretty quickly- I don’t even have to wait the suggested three minutes.  This time however, I set a timer on my phone and didn’t look at it.  I put myself on standby.  Three minutes later, my phone sounds off and I check the test.

What the….?  Two lines?  I squint hard.  My vision is funky cause I’m obviously seeing double.  I look again.  Two lines.  Pregnant.  Pregnant?  Yeah, pregnant.

I start screaming.  “Oh my God!  OH MY GOD!!!”  I immediately start to cry.  I check the test again- still two very solid pink lines.  I continue screaming and start running around the house.  I make it to the kitchen where I start to hyperventilate.  I have to calm down.  What if my freaking out squishes the thing?  No, I can’t be pregnant.  I calm myself down before I have an asthma attack.  I then very quickly grab a bottle of water from the fridge, my car keys, and my purse.  I have to head to the store and buy another test.  Maybe another brand.  Something digital.  Maybe that test was defective. 
I get to Target after I finish chugging my water.  I grab another box of tests and another bottle of water.  Once I head home I have some more water and anxiously await nature’s call. 

I take three more tests in 20 minutes.  Oh yeah, they all say I’m pregnant.  They can’t all be defective, right?

Now I’m thinking, how am I going to tell Thomas?  Our anniversary was coming up, I can tell him then, when we’re in Hawaii.  That’s crazy, I can’t wait a week!  It’s Monday!  Why did I have to take a test on Monday… I should have waited until Friday at least!  You’re being dumb, Lindsey.  You need to know this is happening! 

I hop back in my car and head to a baby store.   I ask the sales woman if they have any Hawaiian onesies.  “For a boy or girl?” she asks.  I tell her it doesn’t matter and immediately want to yell, “I’m pregnant!!!”  but I don’t.  The first person I tell has to be Thomas.  They don’t have anything Hawaiian so I buy a white onesie with a duck on it.  I go to another baby store.  There I grab more onesies, a small video camera, and some wrapping supplies.

When Thomas comes home I ask him to do me a favor to send him out of the room.  I then bring out his gift and hit record on the hidden camera.

“What’s this?” he said. 

“I got your anniversary present.”

“But it’s early.”

“I know but I’m excited.” I say.

He opens the box, makes a joke about getting him tissue paper and then pulls out a onesie.  “Baby clothes?”

Should I wait for him to ask?  I can’t.  “I’m pregnant.”

“What?!”

I explained it all to him.  He hugs me, he kisses me.  I show him the test.  He literally starts hopping up and down because he is so excited.

The next day I start to freak out.  I swear I’m not pregnant.  I just lied to my husband.  I’m a terrible person.  I don’t feel pregnant.  I have no symptoms.  I make an appointment with my doctor so that she can confirm that all four tests were faulty and I’m not pregnant.

Thomas meets me there.  I pee in a cup.  They run the test.  “Positive for pregnancy!  Congratulations!”

Good Lord.  It’s gotta be true, right?  We’re going to have a baby.    

Sunday, April 10, 2011

Going All Out(side)

Our backyard patio has been needing some love since day 1.  We were fortunate enough to get a house that has a large backyard with a covered (and fenced) patio.  I was really excited about all of the possibilities of what I could make out of our outdoor space.  Having never had one before I was pretty shocked at how pricey outdoor items could be!  Unfortunately that meant that our patio would remain pretty bare for the foreseeable future.

Here's what our patio looked like when we moved in:

 Nothing like a blank slate huh?  It took me some time with scouting out some good deals and collecting items for finishing touches (which I haven't quite finished yet) but I finally made a pretty substantial dent in the patio project.

Here's what it looks like now:


 Fun, right?  I think so :)  It's still not 100% done- but the rest I'll get too later (like changing out the ugly light fixture and fixing the misters- yes, we have misters!)

I'll start with the table and chairs that I got.  This glass top table and matching folding chairs were actually something that I bought last year after the summer was over and everything was one sale.  I spotted this same table at Target the other day for $80!!!!  You KNOW I didn't spend that much!  I got it for $25 and spent $9 each for the chairs.  For a while it was actually acting as our dining room table (before we got one). 

 The extra two chairs are serving as additional seating at the moment next to the newly acquired BBQ (more on that later in this post).  I didn't want to squeeze all four chairs around the table because it would start to look squished.  Plus the only way that I could do that is if I put the table in the middle of the patio which dwarfed the rest of the space.  This way it remains open but we have the additional seating if we need it.  I also got the seat pads at Target on the cheap and it adds lots of fun color to the space.  That pot is empty now (it's part of the "not 100% done") but I'm looking for something that's inexpensive and easy to take care of.  It's difficult finding a plant that works well in the heat here, is inexpensive, colorful, and hard to kill (I'm bad with plants).
Now these chairs are my favorite for two reasons.  Reason #1: the style.  I love love love the style of these chairs.  Our whole patio would be this type of furniture if we could afford it.  Reason #2: they were F-R-E-E.  My parents had bought these chairs for their upstairs deck at their beach house.  The only problem with that is that when they sat down, all the saw was the railing- not the beautiful water.  So they bought some taller chairs and brought these beauties over to our house!  Score!
Next up, we have our hanging ornaments.  I like windchimes and all that but I really like neat ornaments that look nifty when the wind blows thru them.  This piece does just that.  I scored it at a store in Long Beach- and I know you can't tell from the picture but it looks rock'n when the wind blows thru it.
The next one that I have is something that I also acquired from my parents.  I can't explain why I love it.  I just do.  So when my parents said they had no use for it anymore I jumped on it.  Problem was, that was years ago and I had nowhere to put it either.  Enter new patio......
Let me explain why I love it.  It reminds me of when I was a kid.  My parents had this hanging in their room and I loved running my fingers through it (it's super soft).  I would also stand underneath it and pretend that the long colorful strands were my long hair- I'm nerdy... don't judge me :)
And here's the pièce de résistance- Thomas' new BBQ.  We've been wanting a BBQ forever!  We wanted one in our Rancho apartment but thanks to a California law saying that you could only have electric grills (what's the point of even having a bbq then?) within 20 feet of a building we couldn't get one.  Now here's why we didn't get one last summer: they are expensive (and our money needed to be spent on more essential items at the time- like furniture and food), they are only available during certain seasons (the good ones anyway) and up until now Thomas was doing his research on what type he wanted (it's his toy after all).
This compact- and totally awesome- BBQ suits our needs just fine.  It's easy to clean, heats up real quick, cooks evenly, and is super purdy.  There's a lot more reasons why we settled on this one (which I won't bore you with now) but we are so excited to finally have one!  We've been smelling our neighbors awesome bbq goodies for months!!!  
Here's how excited we were to finally have the ability to grill.  It was 45 degrees last night and at one point was hailing!  Thomas was still out there playing with his new toy so that we could have street tacos for dinner :)

Yay!  Patio = awesome :)

Monday, March 7, 2011

Love, love, love it!

Two posts in one day... I'm on a roll! Actually, I'm just too excited to wait to share the finishing touches (minus a "no slam" toilet lid) to the hallway bathroom.

I had ordered an extra long 96" shower curtain and had plans to raise the shower curtain as soon as it arrived. Well, about an hour after my last post the curtain was delivered! I was a little anxious because I wasn't sure that the colors would mesh well. After all, I had purchased it online (extra long shower curtains are rarely available in stores... especially a 96" one) and you can never be too sure about what's going to be showing up on your doorstep. I aimed at not being too "matchy-matchy" for fear of being too boring so the colors are similar- but not the same. And thankfully, what arrived is PERFECT!

Here's what the bathroom now looks like with the new "high-rise" shower curtain:Why did I choose to raise the shower curtain? Well, I understand that it isn't everyone's cup-o-tea, but I have to say that I feel like it adds some dramatic height and a shot of luxury to the room. I really wanted this bathroom to be relaxing with a hotel feel (since this acts as a guest bath when we have them) and also wanted it to be a place for me to unwind (this is our only bathroom with a tub and I love me some bubble baths).

Here's a shot of the curtain with the wall color and new chocolate towels that I snagged:
See what I mean? The blue on the curtain is a bit darker while the browns are a bit lighter. It all still pulls together without being too bland. I also love the simple pattern on the curtain... it's not so busy that it hurts your eyes!

Here are a few other details that I added to complete the transformation:This votive wall sconce has been in my possession for a while- in fact it used to be black. But I got spray-paint-happy and painted it silver a few months ago but couldn't figure out where I wanted it. Problem solved- placing it over the towel rack balances out that giant void of wall space while at the same time contributing to the spa feel :)These are what will be our guest towels (as soon as we get our next guests) which I snagged on the cheap at Kohls ($4 each for over-sized towels? Yes please!).

Side-note: When I bought these I totally imagined how Monica Geller I felt. Anyone else remember the episode where the guys are quizzed on how many towel categories she has? Well, I only have four... so I guess I'm not as OCD as she was. Anyhow, off of my towel tangent and back to the bathroom reveal.I picked up this fun little "one-of-a-kind" dish at a fun shop in Long Beach. I take off my rings when I wash my hands (I hate the feel of water under them) but always felt freaked out about just putting them on the counter. What if they fell down the drain? Problem solved. I bought three of these dishes in different colors: one for each bathroom and one for by the kitchen sink.Last but not least is this little doozy. This has actually been in our bathroom for a few months now. My parents bought us this as a fun gift for Christmas- a kitty toilet flusher! Fun huh?

So that's the bathroom reveal! With the exception of a bath mat and a new toilet lid this room is DONE!

Fountain Mist

That's the name of the paint that I finally settled on! Phew- I went through a lot of different ideas when it came to paint. I went from greens to grays to blues and I finally settled on a brighter version of anything that I had originally looked at.

Why the change of heart? Well, paint is the least expensive way to update or upgrade any space in your home and I though that I could take a leap of faith and do something a little outside of my comfort zone. If all else fails and it looks terrible- I could just spend $20 on another gallon of paint and redo it again. Luckily, that won't be necessary! :)

Here's a reminder of what the bathroom looked like before I painted:
BLAH! Everything is white- but so was everything in this house when we moved in. But I'm sure it's better to be working with a blank slate than if we had bought a house with horrific (and hard to cover) paint colors and crazy decorating.

Here's what it looked like after I started painting all the nooks and crannies. I had to remove the medicine cabinet to get into the nook between the cabinet and the mirror. I just couldn't get my 1.5" angled brush back there without making a mess.
Also, notice that I didn't tape anything off. This might explain how this process took me two days to do two coats but I couldn't be happier with the results. When I was doing the rest of the house I taped everything off only to find that some paint still managed to bleed under there anyway.... so this way took longer but I think I'll be sticking with this technique with any future painting projects.

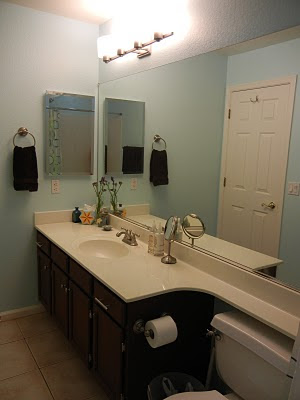
But, without further ado- here is the big reveal of our new beautiful bathroom:
I did my little happy dance when it was all completed and put back together- much like I did after I finished the vanity. Oh, we can't forget a close up of our new beautiful light fixture:Bye bye inexpensive, energy hog, make-up lighting! I LOVE our new fixture! So classy!

The bathroom still isn't completely done yet though. I ordered a new 96" extra long shower curtain and I plan on raising the shower curtain bar all the way up to the ceiling when it arrives. I'm still on the hunt for some inexpensive but still nice bathroom mats to go with the new decor. Who would have thought that bath mats would be so pricey! But they are! I also want to replace the toilet seat with one of those new "no-slam" toilet seats. I won't bother with posting pictures of that venture though- I really doubt anyone is interested in seeing me replace a toilet lid.

Tuesday, March 1, 2011

The Vanity Calamity...

It's over people. I have finished. The project that started with an abrupt crash and burn has been resurrected and the results are awesome- if I do say so myself ;)

A couple of weeks ago I had attempted to sand down and stain our hallway bathroom vanity.... and it did not work out so well (as I wrote about in a previous post). So after sitting on the idea for a while I decided to paint it. I picked out a rich coffee color (Roasted Coffee by Valspar to be exact) and set to work over the weekend.

Here's a reminder of what the vanity looked like on move-in day:
This is what all of the wood looked like throughout our house... the kitchen, both bathroom vanities and the hallway cabinets. We just wanted to update it all and make it more bold with rich color.

Here's a "during" shot of the cabinets....
And finally, here's the after with the new hardware put on:
Before, none of the cabinets in the house had any hardware on it except for the hinges (which aren't pretty). Slowly but surely I hope to fix this. Without hardware, I'm always hurting myself and breaking/bending fingernails when I try to pull the drawers open! Ouch.

Here's a close-up of the purdy new hardware I got complete with new brushed nickel hinges to replace the old, ugly brass ones:
I think it looks so awesome! It really is amazing what a coat of paint can do. I've already slapped up the swatch of the same color in the master bathroom to see if I can use the same paint on that vanity! But I have to be careful not to get ahead of myself. I want to finish one project before I move on- that way I don't have a bunch of half finished projects around the house.

That being said, next weekend I hope to get the bathroom walls painted.... then all that's left is putting up the new light fixture (which has been sitting behind our couch in a box for a few weeks now) and raise the shower curtain.

(Note to self: buy extra long shower curtain).

Thursday, February 24, 2011

Thank Goodness Paint Swatches Are Free....

... because I've been smuggling a boat-load of them out of Home Depot and Lowe's.

What's the reason for my most recent trip to the paint departments? Well, aside from the fact that I still have not decided on a hallway bathroom/laundry room/master bathroom paint color (they will all probably be the same color) I've decided to paint- not stain- the bathroom vanity.

Here's how I came to that decision. First of all- last I posted I said my staining days were probably over. That statement was probably made more out of my defeat for that particular project but I'm still not over the burn of the less than stellar results from that undertaking. I decided that I wanted to give it one more shot and see if it was even possible for me to get the junk off that I applied. So I bust out my power sander and got to work. Thankfully, and to my complete surprise, it didn't take much elbow grease or sand paper to get it all off. The down side is that with wood cabinets like ours, the stain really sinks into the wood grain- leaving us with this:
The door on the left shows what it looked like before my staining debacle while the one on the right shows what I'm working with after sanding it down... again. I didn't think it was that big of a deal because, after all, if I was planning on slapping on another layer of dark stain it would just cover it right up.

New problem. Turns out the veneer on our cabinets is pretty thin. So after sanding down everything I had completely gone through some parts of the veneer entirely leaving this:
The problem with this is that with the veneer gone the stain will soak in differently and unevenly. So staining is now completely off the table.

New solution- enter paint swatches. People paint their vanities white all the time and it looks amazing. So why can't I paint it a deep, rich brown? After all, it worked out on our kitchen cabinets. So I slapped these babies up to look at them for the next day or two and hopefully I can begin painting this weekend. I've already narrowed it down to six paint colors- I immediately tossed two of them once I got them in the room- leaving me with these options:
I also picked up some new paint colors for the wall. After my recent epiphany that I'm sticking with safe (and not fun) color and design schemes I thought that maybe I should try to spice things up a bit. So I got these new swatches:
I am already proud of myself for picking these new brighter colors! I'm really liking the look of them too :) I haven't completely tossed my old swatches though... these ones are still up in the laundry room:

If the hallway bathroom turns out amazing with a bright color maybe I'll even work up the courage to get different colors for the master bathroom and laundry room!

Wednesday, February 23, 2011

A Splash of Color

To say that I like things to coordinate is an understatement. My obsessive compulsive tendencies result in my getting irritated if things clash too much or just don't match. And when it comes to decorating our house I've developed an anxiety about just taking a risk and buying things for our place.

Here's my dilemma- our living room is so well coordinated (minus the bookshelf and tv stand which are two different colors- I'll get to that one day) that now I'm bored! See below picture to see what I mean:

It looks nice- but that's not my issue. The sandy walls, the brown couch, the cream carpet, the beige rug.... where's the color!? I'm getting so bored of looking at the same boring color- and it's everywhere! I've wanted to get some pretty throw pillows, maybe another rug, just something to spice the space up. Problem, I'm afraid of doing anything too bold!

My solution- start small. Worse comes to worse I have to make a return to the store to get something I like better. Here's what I ended up snagging:I'll be the first one to say that this is a minor upgrade at best. The room still needs some work, some color, some flair, possibly some more pattern? But my point is that I'm taking baby steps toward a more interesting color pallet.

Pat on the back for me :) Plus, these plush throw pillows were on the cheap at Kohls. $13.00 each marked down from $33 each plus I got to use $20 Kohls cash. So at least my baby steps didn't throw us into the deep end :)

P.S. Rascal jumped into my "after" pictures to stalk some doves outside.

Wednesday, February 16, 2011

The Money Pit

Since becoming official homeowners on June 9th of last year, Thomas and I have taken on the role of student when it comes to our house. The whole thing is one giant learning experience. One of the biggest lessons that we've learned? That having a home is tough, having a pool is tougher. That pool has been a headache from day one.

Here's a little reminder of what it looked like when we got possession of the house:
Here we were thinking, "Awesome, our first house has a POOL!" How great! Plus, we live in the desert, it's totally necessary! Well, that was then..... we feel differently now. We have fought tooth and nail to keep this pool from continually turning green to no avail. We tried taking care of it ourselves. We tried having a professional pool guy come and get us started with a monster shock treatment. Nope. It still turned green.

All those chemicals aren't cheap either. Added bonus: with the heat here in Phoenix, the chemicals burn off super quick so we were constantly dumping more and more chemicals in there to the point where our whole yard stunk of chlorine. We were continually burning (literally) through our chemical supply. I've also learned through all of this that I can't stand pool supply stores. Seriously, I revert to being a whiney little kid when we have to go. I avoid it at all costs.

After many, many, many trips to test the water at the pool supply shop we finally figured out that we needed to drain the pool and get an acid wash. Our algae problem was just too severe. Here's what it looked like after the pool was drained:

YUCK! It looked 10x worse without the nasty water in it. Next thing we found out when we had the pool drained? We don't just have algae- we have black algae. What is black algae? Well, it's like death for a pool! Okay, that might be an exaggeration, but it's bad. It doesn't go away with a simple acid wash (which is diluted). The pool peeps we hired had to make an acid paste and slap it on anywhere in the pool that had those black patches so that it could really sink in and kill it. Not only that- but the guy said that our algae problem was so bad that he had to do two acid washes because one just didn't cut it. Thankfully I was visibly upset when he told me this so he didn't add any extra charges. Yay for being an emotional girl!

When the washes were done though, our pool still looked like this:See the splotchy imperfection? So our pool dude informed me that our pool used to look beautiful and perfect and a deep aqua blue like our neighbors pool. But because of years of neglect our pool now looks like this. How do we fix this? With a $4,000 pool resurfacing :( The water works started again, but the pool dude couldn't help me this time with a cost break because he doesn't resurface pools. Obviously we don't have the cash to go ahead and deal with the problem now.

The good news is that we should be able to maintain the pool as is (no green muck) with chlorine until we can get it resurfaced. Another downside: since we do have the black algae issue and he couldn't guarantee that it was totally gone (it burrows under the plaster- the little jerks!) we have to keep our pool with at least a 5% chlorine level and even higher in the summer which is similar to what public pools do instead of the regular 2% otherwise recommended.

So after two days of the acid wash and refilling the pool we have started saving for our pool to be resurfaced. Luckily we were told that we should be able to hold out for 2 years before it becomes totally necessary. And with the pool refilled you can't really tell how uneven the plaster is. This is what it looks like as of right now:A million times better and many lessons learned.